| 1. Have the print outs and tools ready. Scissors, glue (or tape), a tool to prepare the bends of the paper, and a ruler, are basic tools that you needed. It is preferable to print the bellows on a standard weight paper. |
|
 |
2. Fold the front side section into shape and attach the front panel to the side sections. Do the same for the rear section. |
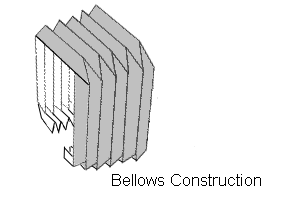 |
3. Time to create the bellows. It is the most difficult. Cut it out and carefully scribe the bending lines! Then strictly follow the bending lines: Solid white line – Outside bend To achieve really perfect bends, inside bend lines should be scribed or groved on the unprinted back side of the paper. Note: A fixed bellows is available as an alternative. |
 |
4. Attach the folded bellows to the sides and roof of the front and the rear sections. |
 |
5. Insert the white panels to where the sides and the bellows connect. They will serve as supporting walls. |
 |
6. Connect the front and rear bottom panels by inserting the front forks into the rear hole. The front bottom section should be on top of the rear section with the forks sticking out to the bottom.
7. Once the forks are fully inserted, push the forks toward the bottom panel. The front and rear bottom panels should be able to swing freely. |
| 8. Attach the bottom panels to the tops. Lightly bend the real bellows if necessary to make the sections fit. | |
| 9. Attach roof top A/C panels | |
| 10. You will have a bendable articulated paperbus (if a real bellows is used) |